Feeds:
Posts
Comments

Archive for July, 2011

New jersey blueberry pie

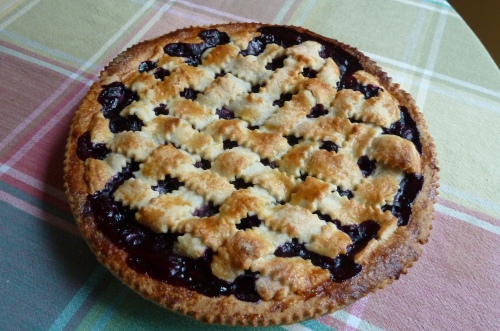
So, it appears I’m on a bit of a fruit pie kick right now…I just can’t help myself! Blueberry is my favorite fruit pie and blueberries from New Jersey are among the best. Plus they’re in season right now and look incredible at my local farmer’s market.

Below is one of my favorite blueberry pie recipes. The hint of cinnamon and citrus really bring out the flavor of the blueberries without overpowering them. Feel free to substitute lemon zest and juice in place of the orange, if you prefer.

Cheers to summer berries!

Blueberry Pie
Serves 8-10 people

Ingredients
1 Twice-Baked Fluffy Pie Crust recipe
4 cups blueberries, from New Jersey if possible
1 tablespoon fresh orange juice
1/2 cup sugar, plus more for sprinkling
1/4 cup light brown sugar, packed
3 tablespoons cornstarch
1/2 teaspoon grated orange zest
1/4 teaspoon salt
1/4 teaspoon cinnamon
1 tablespoon cold unsalted butter, cut into small pieces
1 egg

Instructions
Follow these instructions to pre-bake the bottom pie crust. While the crust is baking, make the pie filling.

In a large bowl, combine the blueberries and orange juice. Toss to coat evenly.

In a small bowl, stir together the sugars, cornstarch, orange zest, salt and cinnamon. Sprinkle the sugar mixture over the blueberries and toss to distribute evenly.

New jersey blueberries

Remove bottom crust from oven and immediately transfer berry mixture to the pie pan. Mound filling in the pan and dot the top with pieces of cold butter and set aside. Bring the oven temperature down to 375 degrees.

Remove the second dough disk from the refrigerator and roll out to an 11-inch circle on a lightly floured surface. Carefully position over the top of the pie. Trim and fold edges neatly. Alternatively, for a lattice crust (my favorite!) cut into strips and follow this guide.

Pie headed into the oven

Whisk the egg with a splash of water and brush egg wash over the unbaked pie dough. Sprinkle the wet dough with a light dusting of white or raw sugar.

Bake the pie until the crust is golden and the filling is thick and bubbly, approximately 50-60 minutes. Transfer to a wire rack and cool completely.

Serve at room temperature with whipped cream or a scoop of your favorite ice cream.

Read Full Post »

Prize-winning strawberry rhubarb pride pie

If you haven’t been to the Jazz Age Lawn Party on Governor’s Island, go.  Hosted by Michael Arenella and his Dreamland Orchestra, it’s a flashback to the 1920s with beautiful jazz, flapper dresses, lovely St. Germain cocktails and a rather competitive amateur pie contest.

Dance floor

You may remember that my very first blog post was about this event.  Specifically, it was my Peach Pie Cupcake recipe that won the “Bandleader’s Choice” category at the Jazz Age Lawn Party in 2010.

The beautiful Olivia

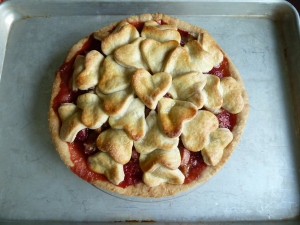
I’m excited to report that I took home another blue ribbon this year! My Strawberry Rhubarb Pride Pie won first place in the “Hobo’s Choice” category, which according to the pie judges, means it’s “so yummy that a hobo would want to steal it while it was cooling on a windowsill.”

Buffet of pies

I love rhubarb and this event was perfectly timed with rhubarb season. The secret to this pie is double baking the crust.  It keeps the bottom from getting soggy and is a great crust for any fruit or berry pie.

This was also my first time using tapioca in a pie, which works well for fruit that is particularly watery, such as strawberries. One tip when using tapioca – grind the already small granules in a coffee grinder in advance to make them as invisible as possible in the pie.

The Jazz Age Lawn Party was also one day after the Marriage Equality Act passed in New York, hence the beautiful hearts. This is my pride pie!

Enjoy this recipe when you can find rhubarb in at your local market. In the meantime, pack a picnic and head to the next Jazz Age Lawn Party August 20-21 on Governor’s Island.


Twice-Baked Fluffy Pie Crust

Recipe adapted from Smitten Kitchen
Yields one double layer pie crust

Ingredients
1 cup very cold water
2 1/2 cups all-purpose flour
1 tablespoon sugar
1 1/4 teaspoons salt
2 sticks unsalted butter, chilled and cut into pieces

Instructions
Fill a cup with water and a few ice cubes. Set aside.

Crust in the works

In a large bowl, whisk together the flour, sugar and salt until combined. Sprinkle the small pieces of chilled butter over the flour mixture. Using a pastry blender (or two forks), work the butter into the flour mixture until all of the butter pieces are the size of small peas and the mixture is combined and crumbly. It’s ok if the mixture is slightly uneven.

Drizzle 1/2 cup cold water over the flour mixture. Using a rubber spatula, gather the dough together. Add more water, one tablespoon at a time, if needed, to bring the dough together. Gather the mixture together with your hands into one neat mound.

Divide the dough into two even mounds and form each mound into disks. Wrap each disk in plastic wrap and chill in the refrigerator for 1-2 hours (or up to one week).

Preheat the oven to 425 degrees. Place one dough disk on a lightly floured surface and roll into a 12 inch circle, about 3/8-inch thick. Transfer to a 9-inch pie place. Line dough with foil and weigh it down with pie weights, dry rice or dry beans. Bake until crust is light golden brown, approximately 20-25 minutes. While crust is baking, prepare the pie filling.

Prize-Winning Strawberry Rhubarb Pride Pie
Recipe adapted from Smitten Kitchen
Yields 8-10 servings

Ingredients
Twice-Baked Fluffy Pie Crust recipe
3 1/2 cups (about 1 1/2 pounds, untrimmed) rhubarb, in 1/2-inch thick slices
3 1/2 cups (about 1 pound) strawberries, hulled and sliced if big, halved if tiny
1/3 cup sugar, plus more for sprinkling on top of pie
1/4 cup light brown sugar
1 tablespoon lemon juice
1/4 teaspoon salt
1/4 cup quick-cooking tapioca
2 tablespoons unsalted butter, cut into small pieces
1 large egg yolk

Rhubarb, cut into 1/2 inch pieces

Instructions
In a large bowl, combine the rhubarb, strawberries, sugars, lemon juice, salt and tapioca. Set aside until crust is out of the oven.

Rhubarb and strawberries

Remove the crust from the oven and change the oven temperature to 400 degrees. Remove the foil and pie weights and mound the filling on top of the bottom pie crust.  Dot with bits of unsalted butter.

On a lightly floured surface, roll out the second pie disk into an 11 inch circle and place on top of pie filling. Cut several decorate slits in it to release air while it cooks. Tuck rim of dough underneath itself and crimp it decoratively. Alternatively, use a cookie cutter to create shapes of dough and place them strategically on topic of the filling.

Pie heading into the oven

Transfer pie to a baking sheet. Combine egg yolk with 1 tablespoon of water and brush mixture over dough. Bake for 20 minutes then reduce temperature to 350 degrees and bake for an additional 25 to 30 minutes, until the pie is golden and the juices bubble visibly.

Hot out of the oven

Transfer pie to wire rack to cool completely before eating.

Words to live by...


Read Full Post »

Ice cream sandwich

The heat wave that’s currently hitting New York and New Jersey is killing me! Anyone that knows me, knows that I don’t handle 105 degree weather well.  I aimlessly wander about, empty of energy and severely depressed…

Naturally, I turn to sweets to make myself feel better. Ice cream sandwiches are a great pick me up and easy to make at home.

If you don’t have an ice cream maker, substitute a quart of your favorite ice cream and make the cookie recipe below. If you’re boycotting oven use altogether (this recipe calls for a meager 325 degrees), you can also buy your favorite cookies and make a chipwich by sandwiching a scoop of softened ice cream between two cookies.

If you’re in Manhattan and looking for a great ice cream sandwich, I love The Meatball Shop’s perfect flavor combinations.


Peaches ‘n Ice Creme

Recipe adapted from Ben & Jerry’s Homemade Ice Cream & Dessert Book
Makes one generous quart

Ingredients
2 cups finely chopped ripe peaches (or nectarines), peeled if you prefer
1 1/4 cups sugar
Juice of 1/2 lemon
2 large eggs
2 cups of heavy cream
1 cup whole milk
1/2 tsp vanilla

Instructions
Combine the peaches, 1/2 cup of sugar and the lemon juice in a medium bowl.  Cover and refrigerate for 2 hours, stirring occasionally.

Remove the peaches from the refrigerator and drain the juice well, into a separate bowl.  Return the peaches to the refrigerator.

Whisk the eggs in a large bowl until light and fluffy, 1-2 minutes. Slowly whisk in the remaining 3/4 cup sugar and continue whisking for one more minute until completely blended. Pour in the cream and milk and whisk to blend. Add the peach juice and whisk to blend. If it’s particularly hot in your house, cover the ice cream mixture and chill in the refrigerator for at least two hours or up to 24 hours, otherwise proceed to the next step. If you do chill the mixture, be sure to whisk it again before adding to ice cream machine.

Transfer the cream mixture to an ice cream machine and freeze according to manufacturer’s instructions, approximately 20-25 minutes.  After the ice cream has begun to stiffen, approximately 2 minutes before it’s done, add 1 cup of the chilled peaches (make sure the peaches are well drained before adding them to the ice cream). Continue freezing until the ice cream is done.

Transfer to freezer-friendly containers and freeze.


Brown Butter Sheet Cookie

Recipe adapted from Bon Appetit

Ingredients
Nonstick vegetable oil spray
1 cup all purpose flour
1/4 teaspoon baking soda
pinch of salt
1 stick unsalted butter
1/2 cup light brown sugar, packed
2 tablespoons light corn syrup
2 large egg yolks
1/2 teaspoon vanilla extract

Instructions
Preheat oven to 325 degrees. Line a 13x9x2-inch metal baking pan (preferably with straight sides) with foil, leaving 1-inch overhang on long sides. Coat lightly with nonstick spray.

Whisk flour, baking soda, and pinch of salt in medium bowl. Melt butter in small pot over medium heat. Cook until the butter turns a deep golden brown, stirring often, about 5 minutes. Remove from heat and set aside.

Place sugar and corn syrup in a large bowl. Add browned butter and whisk to combine (mixture will not be smooth). Whisk in egg yolks and vanilla. Add flour mixture and stir just to blend. Transfer soft dough to prepared pan. Using an offset spatula, press into a thin, even layer.

Bake cookie layer until golden brown around edges and sides are just beginning to pull away from pan edges, 15 to 17 minutes. Cool completely in pan on rack.

Using the foil overhang, lift the cookie layer from the pan and place on work surface. Place sheet of plastic wrap lengthwise in same pan, leaving overhang on both short sides of pan. Place another sheet of plastic wrap crosswise in pan, leaving overhang on long sides of pan. Cut cookie layer in half crosswise. Return 1 cookie half, top side down, to pan, placing snugly in 1 short end of pan. Slightly soften ice cream and then spread evenly over cookie in pan. Place second cookie half, top side up, atop ice cream, pressing slightly to adhere. Fold plastic wrap up and over ice cream-filled cookie. Freeze until firm, at least 4 hours.

Just before eating, use a serrated knife to cut the ice cream sandwich block into small strips of ice cream sandwiches.

Party sandwiches

Read Full Post »

chocolate crepe cake

I recently realized that the only time I make pastry crème is for Jocelin’s birthday. As many of you know, my sister Jocelin typically demands unusual or obscure European birthday treats, such as last year’s Swedish Princess Cake, which was a big hit for the dirty thirty.

This year, I presented Jocelin and Eddie, who share a dual birthday celebration, with several ideas and they chose a Crepe Cake.

Crepe Cake, or Gateau de Crepes, is a traditionally a towering pile of crepes separated by thin layers of pastry cream. Since Jocelin loves fruit and crème and Eddie is a chocoholic, I created the below recipe that combines Francois Payard’s fluffy chocolate crepes with a refreshing orange pastry crème and then smothers the whole cake in ganache.

For those of you that have never made a crepe, it’s easy. They do take a bit of time (3 minutes per crepe) and require you to stay focused on the task at hand, but are well worth the effort.

The crepe recipe below will yield nearly double the amount of crepes you’ll need for the cake, but I recommend making the full batch and filling leftover crepes with fruit and Nutella for breakfast or dessert.

Chocolate Crepe Cake with Orange Crème
Makes one, 8 inch cake

Chocolate Crepes

Ingredients:
2 cups, plus 2 tbsps all-purpose flour
1/3 cup cocoa
1/2 cup sugar
pinch of salt
8 large eggs
2 cups, plus 1 tbsp whole milk
grated zest of two oranges
10 tbsps browned butter (recipe below)
1 cup heavy cream

Directions:
Combine the flour, cocoa powder, sugar and salt in a large mixing bowl.  Set aside.

In another large bowl, whisk together the eggs, milk and orange zest.  Gradually whisk the egg mixture into the dry ingredients.  Then whisk in the browned butter, then the cream, until incorporated.  Strain the batter to remove any lumps and whisk it until thoroughly combined.  Cover the bowl with plastic wrap and refrigerate for at least two hours, or up to overnight.

chilled chocolate crepe batter

Remove the chilled batter and whisk briefly.  Place a small crepe pan or non-stick skillet (approximately 8 inches in diameter) over medium-high heat and spray with vegetable oil.  Once hot, pour ¼ cup of batter into the pan, and quickly swirl to coat the bottom of the pan in a thin, even layer (if you’ve never made a crepe before, check out this video).  After two minutes, use a spatula to lift up the crepe and flip. Cook the opposite side for one more minute.  Remove from pan and cool.  The edges of the crepe will be crispy and the center should be moist.  Repeat the process until the batter is gone.  Pile the crepes one on top of another on a plate.  When the batter is gone, cover the pile of crepes with plastic wrap and refrigerate until ready to assemble the cake.

To Make the Browned Butter: Place the desired amount of butter in a small saucepan over medium-high heat and let come to a boil.  Cook, stirring occasionally to keep distribute the heat evenly, until the butter starts to turn light brown. Remove from heat immediately and set aside. Cool for 5 minutes and use immediately.

butter on the verge of browning

Orange Pastry Crème

Ingredients:
2 cups whole milk
1 tbsp orange juice
1 tsp orange zest
½ cup sugar
5 tbsps cornstarch
4 large egg yolks
1 tbsp unsalted butter
1 cup heavy cream

Directions:
Combine the milk, orange juice and orange zest in a medium saucepan and place over medium heat.  Remove from heat as soon as small bubbles start to form around the edges of the pan.

Meanwhile, combine the sugar and cornstarch in a medium bowl, and whisk in the egg yolks.  The mixture will seem very dry. Continue to whisk until the mixture becomes moist and the yolks turn pale yellow (1-2 minutes).

Slowly add a quarter of the hot milk into the yolk mixture, whisking constantly to keep the yolks from curdling.  Then pour the remainder of the milk into the mixture and whisk until thoroughly combined.  When the milk is well incorporated, return the mixture to the saucepan and place over medium-high heat, whisking constantly to prevent lumps from forming.  Whisk and cook until the mixture becomes very thick and bubbles start popping from the center of the pan for at least 20 seconds.  The mixture needs to come to a boil in order to activate the cornstarch.

Remove from heat and whisk in the butter until it melts and the mixture is smooth.  Pour the pastry cream into a glass bowl and cover with plastic wrap to prevent a skin from forming.  Let it cool to room temperature, then refrigerate until ready to use.

Just before assembling the cake, whisk the pastry crème for one minute.  In a stand mixer fitted with the whisk attachment, whisk the heavy cream until soft peaks form.  Gently fold in one quarter of the whipped cream just until combined.  Then fold in the remaining whipped cream until well combined and there are no more white streaks.

Chocolate Ganache

Ingredients:
10 ounces semisweet chocolate, finely chopped
1 1/4 cups heavy cream
1 tablespoon light corn syrup
Pinch of salt

Directions:
Place chocolate in a large, heat-proof bowl and set aside.

Bring cream, corn syrup, and salt to a boil in a medium saucepan over medium-high heat. Remove from heat and pour hot cream over chocolate. Let stand for 3-4 minutes. Whisk, beginning in the center of the bowl and moving toward the perimeter of the bowl, until the cream and chocolate are completely combined and the mixture is smooth.  Set aside and let cool completely.

Assembling the Cake

Remove the chilled crepes and pastry crème from the refrigerator.

Place one crepe on a plate and top with approximately ¼ cup and 1 tsp of pastry crème. Use an offset spatula to spread crème into a thin even layer, leaving a one inch border on the crepe.  Repeat until pastry crème is gone, ending with a crepe on top.

Carefully pour spoonfuls of the chocolate ganache over the top of the cake, letting it drip down the sides and into the layers of the cake. Decorate as desired.

Chocolate crepe cake

Read Full Post »
Red velvet cupcake tower

I can’t believe the Fourth of July is here already!

As we head into what is sure to be another beautiful weekend, I wanted to pass along my Red Velvet Cupcake recipe.

Like most southern red velvet recipes, this one calls for very little cocoa, oil and buttermilk, making the cake light and fluffy (and bright red!). 

I recommend buying no-taste red food coloring at a kitchen supply store.  It’s not expensive and will really impact the flavor of the cupcake.

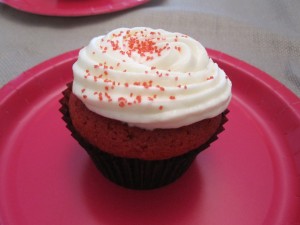
These cupcakes are the perfect colors for the Fourth of July.  You can make the below recipe as is with blue sprinkles, make Blue Velvet Cupcakes by using blue food coloring, or make a mix of red and blue cupcakes.  It’s up to you!

Either way, enjoy these tasty treats and cheers to American Independence!

Southern Red Velvet Cupcakes
Recipe adapted from Cakeman Raven, NYC
Makes 24 cupcakes

Ingredients
Cupcakes:
2 1/2 cups all-purpose flour
1 1/2 cups white sugar
1 teaspoon baking soda
1 teaspoon fine salt
1 1/2 teaspoons cocoa powder
1 1/2 cups vegetable oil
1 cup buttermilk
2 large eggs, at room temperature
2 tablespoons of no-taste red food coloring
1 teaspoon white vinegar
1 teaspoon vanilla extract

Frosting:
1 pound cream cheese, softened
4-5 cups sifted confectioner’s sugar
2 sticks unsalted butter, softened
1 teaspoon vanilla extract
Crushed pecans for garnish (optional)

Instructions
To make the cupcakes:
Preheat the oven to 350 degrees and line 24 muffin cups with paper liners. Set aside.

In a large bowl, combine the flour, sugar, baking soda, salt and cocoa powder. Set aside.

In another large bowl,  or in the bowl of a stand mixer, whisk together the oil, buttermilk, eggs, food coloring, vinegar and vanilla. With the mixer on low, mix the dry ingredients into the wet ingredients until the batter is is smooth. Do not over mix.

Fill cupcake liners 2/3 of the way and bake for 22 minutes, or until a toothpick inserted in the middle of a cupcake comes out clean. Remove cupcakes from oven. Cool one minute in pan, then remove cakes from pan and cool completely on wire rack.

To make the frosting:
In a large bowl, or the bowl of a stand mixer, combine the cream cheese, sugar and butter. Mix on low speed until just incorporated. Increase the speed to high and beat for 5 minutes, until light and fluffy.

Reduce the speed to low and add vanilla. Increase the speed to high and beat for one more minute.

Frosting will be soft. Store frosting in refrigerator until somewhat stiff before frosting cupcakes (30-60 minutes).

Frosting can be stored in the refrigerator for up to 3 days, or frozen for 2 weeks.

Frost cupcakes and store in the refrigerator to keep frosting and decorations stiff. Let cupcakes come to room temperature before enjoying.

red velvet cupcake

Read Full Post »